Spring IOC概念及作用
概念
基于XML的IOC环境搭建
spring5 版本是用 jdk8 编写的,所以要求 jdk 版本是 8 及以上。
时 同时 tomcat 的版本要求 8.5 及以上
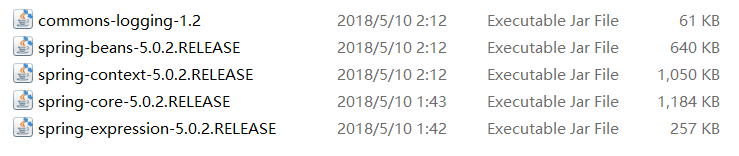
1.导入spring核心容器必须的jar包
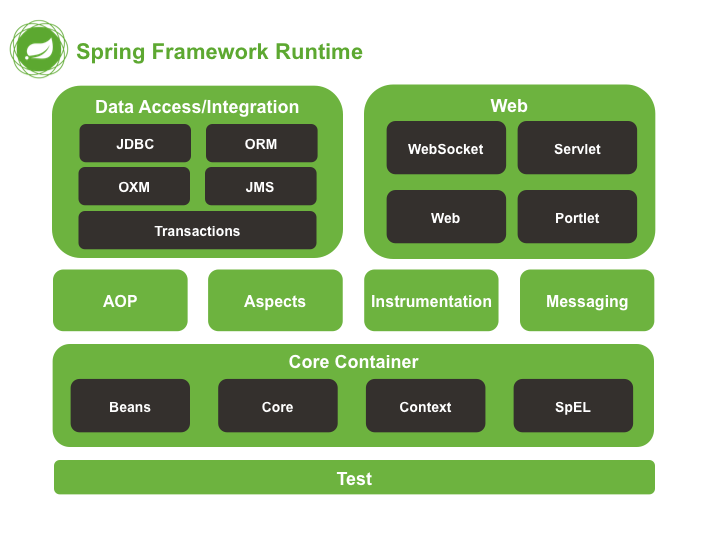
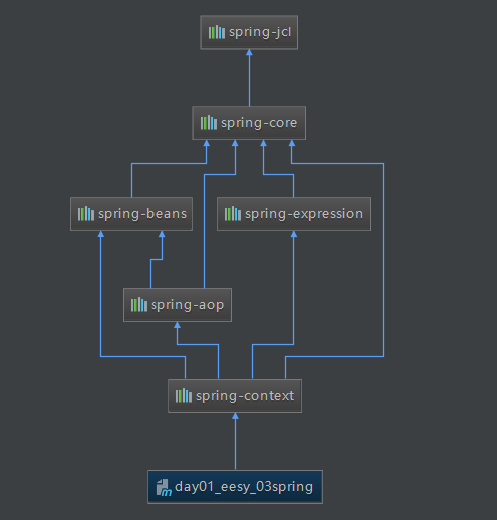
根据Spring的结构图可知,spring核心容器包括Beans,Core,Context,SpEL,此外还需要一个日志jar包
- 所需jar包截图
- Spring结构图
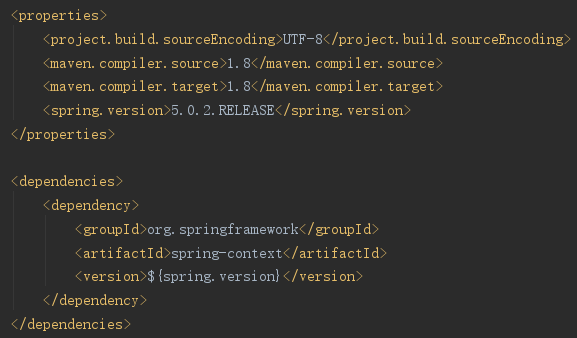
- 在maven的pom.xml文件中只需要导入context jar包就可以,maven会自动添加依赖包
- 可以在maven project窗口中项目jar包之间的依赖关系
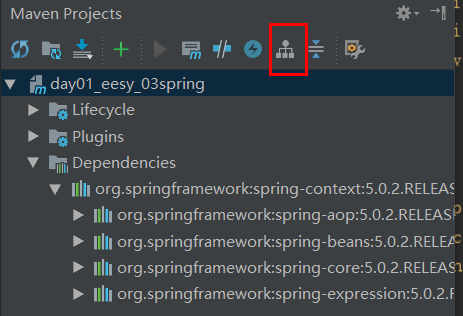
- context依赖的包都会被导入,jcl包中封装了日志包,aop是使用注解时需要的包
2.创建业务层接口及实现类
1 | public interface IAccountService { |
3.创建持久层接口及实现类
1 | public interface IAccountDao { |
4.创建spring配置文件applicationContext.xml
配置dao和service,将对象的创建交给spring管理
1 |
|
5.测试
1 | public class Client { |
理解部分
ApplicationContext的三个实现类
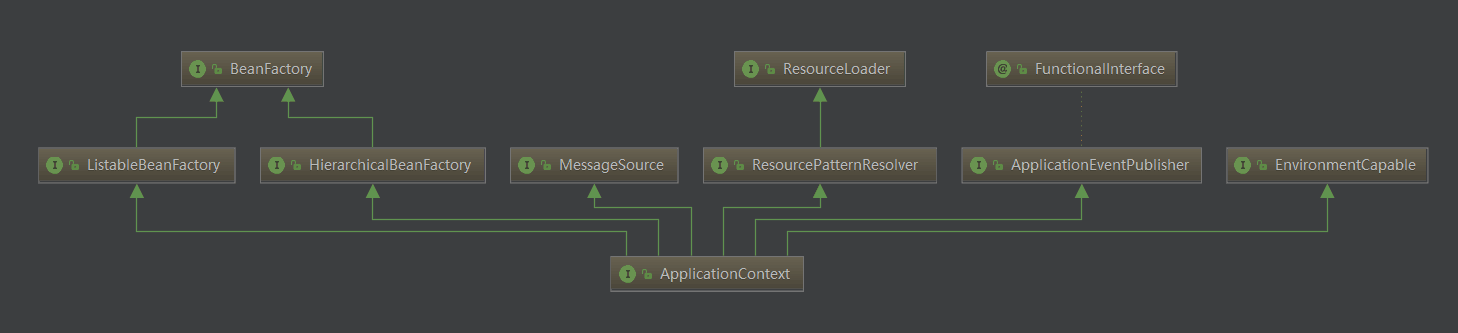
- 鼠标放在ApplicationContext上,右键->diagram->show diagram,可以看到其继承关系,BeanFactory就是spring核心容器的顶层接口
- 在ApplicationContext上再次右键->show implementation可以看到接口的实现
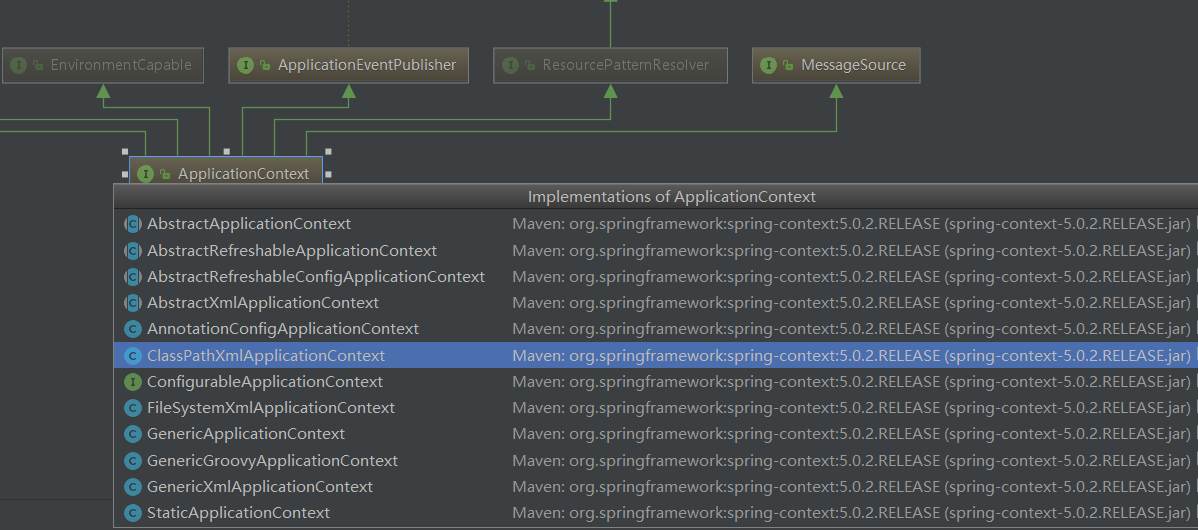
- 常用的三个:
- ClassPathXmlApplicationContext:可加载类路径下的配置文件,要求配置文件必须在类路径下。不在的话,加载不了。(更常用)
- FileSystemXmlApplicationContext:可以加载磁盘任意路径下的配置文件(必须有访问权限)
ApplicationContext ac = new FileSystemXmlApplicationContext("C:\\Users\\HASEE\\Desktop\\application.xml"); - AnnotationConfigApplicationContext:用于读取注解创建容器的
BeanFactory 和 ApplicationContext 的区别
- BeanFactory 才是 Spring 容器中的顶层接口,ApplicationContext 是它的子接口。
- 创建对象的时间点不一样,实际开发中根据具体情况选择
- ApplicationContext:创建对象采取的策略是采用立即加载的方式,只要一读取配置文件,默认情况下就会创建对象。(也可以延迟加载)
- BeanFactory:创建对象采取的策略是采用延迟加载的方式,什么时候使用什么时候创建对象。
1 | //--------BeanFactory---------- |
应用情况
- ApplicationContext: 单例对象适用 (更多采用此接口)
- BeanFactory: 多例对象使用
Spring对bean的管理细节
创建bean的三种方式
1.使用默认构造函数创建。
在spring的配置文件中使用bean标签,配以id和class属性之后,且没有其他属性和标签时。
采用的就是默认构造函数创建bean对象,此时如果类中没有默认构造函数,则对象无法创建。1
<bean id="accountService" class="com.service.impl.AccountServiceImpl"></bean>
2.使用普通工厂中的方法创建对象(使用某个类中的方法创建对象,并存入spring容器)
1
2<bean id="instanceFactory" class="com.factory.InstanceFactory"></bean>
<bean id="accountService" factory-bean="instanceFactory" factory-method="getAccountService"></bean>3.使用工厂中的静态方法创建对象(使用某个类中的静态方法创建对象,并存入spring容器)
1
<bean id="accountService" class="com.factory.StaticFactory" factory-method="getAccountService"></bean>
第二,三种方式应用场景:使用jar包中或者别人写的类时,不能确定是否含义默认构造函数
bean对象的作用范围
bean标签的scope属性:
- 作用:用于指定bean的作用范围
- 取值: 常用的就是单例的和多例的
- singleton:单例的(默认值)
- prototype:多例的
- request:作用于web应用的请求范围
- session:作用于web应用的会话范围
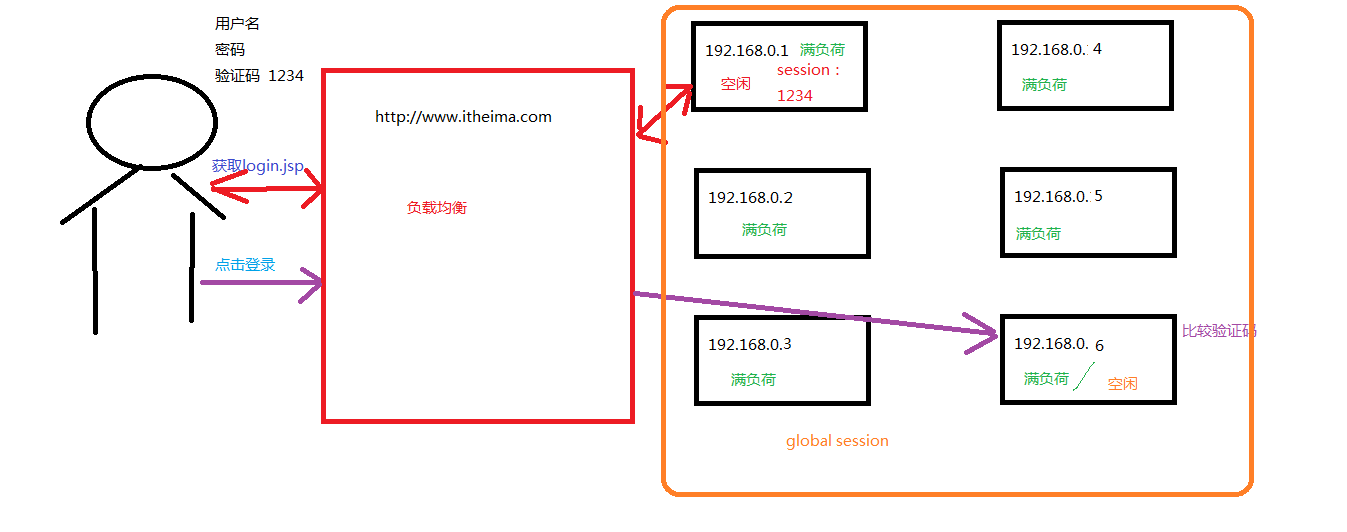
- global-session:作用于集群环境的会话范围(全局会话范围),当不是集群环境时,它就是session
1
2
3
4
5<bean id="accountService" class="com.service.impl.AccountServiceImpl" scope="prototype"></bean>
//以下语句用singleton只会创建一次,as1=as2,用prototype会创建两次as1!=as2
IAccountService as1 = (IAccountService)ac.getBean("accountService");
IAccountService as2 = (IAccountService)ac.getBean("accountService");
全局session用于session在多台服务器处理时共享
bean对象的生命周期
单例对象
出生:当容器创建时对象出生(立即加载)
活着:只要容器还在,对象一直活着
死亡:容器销毁,对象消亡
总结:单例对象的生命周期和容器相同多例对象
出生:当我们使用对象时spring框架为我们创建(延迟加载)
活着:对象只要是在使用过程中就一直活着。
死亡:当对象长时间不用,且没有别的对象引用时,由Java的垃圾回收器回收1 | <bean id="accountService" class="com.service.impl.AccountServiceImpl" |
Spring的依赖注入 Dependency Injection
依赖关系的管理,都交给spring来维护.在当前类需要用到其他类的对象,由spring为我们提供,我们只需要在配置文件中说明。依赖关系的维护,就称之为依赖注入。
能注入的数据:有三类
- 基本类型和String
- 其他bean类型(在配置文件中或者注解配置过的bean)
- 复杂类型/集合类型
注入的方式:有三种
- 使用构造函数提供
- 使用set方法提供
- 使用注解提供
1. 构造函数注入:实际开发不常用
标签:constructor-arg
位置:bean标签的内部
标签属性
- type:用于指定要注入的数据的数据类型,该数据类型也是构造函数中某个或某些参数的类型
- index:用于指定要注入的数据给构造函数中指定索引位置的参数赋值。索引的位置是从0开始
- name:用于指定给构造函数中指定名称的参数赋值 (直接明确,常用)
以上用于找到构造函数参数
- value:用于提供基本类型和String类型的数据
- ref:用于指定其他的bean类型数据。它指的就是在spring的Ioc核心容器中出现过的bean对象
1
2
3
4
5
6
7
8
9
10
11
12
13
14//service实现类构造器
public AccountServiceImpl(String name,Integer age,Date birthday){
this.name = name;
this.age = age;
this.birthday = birthday;
}
//配置文件
<bean id="accountService" class="com.service.impl.AccountServiceImpl">
<constructor-arg name="name" value="泰斯特"></constructor-arg>
<constructor-arg name="age" value="18"></constructor-arg>
<constructor-arg name="birthday" ref="now"></constructor-arg>
</bean>
<!-- 配置一个日期对象 -->
<bean id="now" class="java.util.Date"></bean>
优势:
- 在获取bean对象时,注入数据是必须的操作,否则对象无法创建成功。
弊端:
- 改变了bean对象的实例化方式,使我们在创建对象时,如果用不到这些数据,也必须提供。
2. set方法注入 (常用)
标签:property
位置:bean标签的内部
标签属性
- name:用于指定注入时所调用的set方法名称
- value:用于提供基本类型和String类型的数据
- ref:用于指定其他的bean类型数据。它指的就是在spring的Ioc核心容器中出现过的bean对象
优势:
- 创建对象时没有明确的限制,可以直接使用默认构造函数
弊端:
- 如果有某个成员必须有值,则获取对象是有可能set方法没有执行。
set方法 基本类型,bean类型注入
1 | //set方法 |
1 | //bean配置 |
set方法 注入集合数据
1 | //实现类的set方法 |
1 | //配置文件 |
基于注解的IOC(11个注解)
环境搭建步骤与前面类似,只需要将配置文件xml配置换成注解
- XML的配置:
1
2
3<bean id="accountService" class="com.service.impl.AccountServiceImpl" scope="" init-method="" destroy-method="">
<property name="" value="" | ref=""></property>
</bean>
创建对象(4个)
作用就和在XML配置文件中编写一个<bean>标签实现的功能是一样的
- Component:
- 作用:用于把当前类对象存入spring容器中
- 属性:
value:用于指定bean的id。当我们不写时,它的默认值是当前类名,且首字母改小写。
- Controller:一般用在表现层
- Service:一般用在业务层
- Repository:一般用在持久层
以上三个注解他们的作用和属性与Component是一模一样。
他们三个是spring框架为我们提供明确的三层使用的注解,使我们的三层对象更加清晰
修改配置文件
- 加入context名称空间,配置创建容器时要扫描的包,否则Component无效
1 |
|
实现类写法
1 | //所有写法作用一样 |
注入数据(4个)
作用就和在xml配置文件中的bean标签中写一个<property>标签的作用是一样的
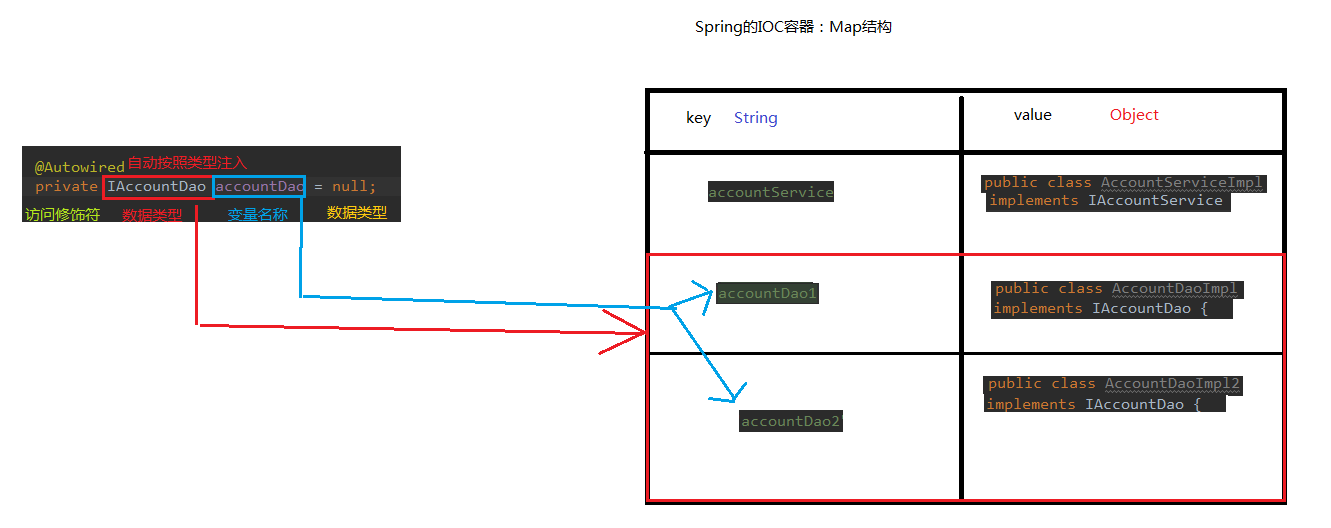
Autowired:
1 | ("accountService") |
- 作用:自动按照类型注入。
- 只要容器中有唯一的一个bean对象类型和要注入的变量类型匹配,就可以注入成功
- 如果ioc容器中没有任何bean的类型和要注入的变量类型匹配,则报错。
- 如果Ioc容器中有多个类型匹配时:在匹配的类型中在对变量名称也就是bean的id匹配
- 出现位置:
可以是变量上,也可以是方法上 - 细节:
在使用注解注入时,set方法就不是必须的了。 - 自动按照类型注入的查找过程
Qualifier:
- 作用:在按照类中注入的基础之上再按照名称注入。它在给类成员注入时不能单独使用。但是在给方法参数注入时可以
- 属性:value:用于指定注入bean的id。
1
2
3
4
5
6
7
8
9
10("accountService")
public class AccountServiceImpl implements IAccountService {
("accountDao1")
private IAccountDao accountDao = null;
public void saveAccount(){
accountDao.saveAccount();
}
}
- 属性:value:用于指定注入bean的id。
Resource
- 作用:直接按照bean的id注入。它可以独立使用
- 属性:
name:用于指定bean的id。1
2
3
4
5
6
7
8
9("accountService")
public class AccountServiceImpl implements IAccountService {
(name = "accountDao2")
private IAccountDao accountDao = null;
public void saveAccount(){
accountDao.saveAccount();
}
}
以上三个注入都只能注入其他bean类型的数据,而基本类型和String类型无法使用上述注解实现。
另外,集合类型的注入只能通过XML来实现。
Value
- 作用:用于注入基本类型和String类型的数据
- 属性:
- value:用于指定数据的值。它可以使用spring中SpEL(也就是spring的el表达式)
- SpEL的写法:${表达式}
1
2("${jdbc.driver}")
private String driver;
改变作用范围(1个)
他们的作用就和在bean标签中使用scope属性实现的功能是一样的
Scope
- 作用:用于指定bean的作用范围
- 属性:value:指定范围的取值。常用取值:singleton prototype,默认单例
1 | ("accountService") |
生命周期相关(2个) 了解
- 作用:和在bean标签中使用init-method和destroy-methode的作用是一样的
PreDestroy
- 作用:用于指定销毁方法
PostConstruct
- 作用:用于指定初始化方法
1 | ("accountService") |
Spring新注解(5个)
以上注解只能注入自己开发的类而不能注入jar包中的类
bean中遗留配置
1 | <context:component-scan base-package="com"></context:component-scan> |
@Configuration
- 作用:指定当前类是一个配置类
- 细节:当配置类作为AnnotationConfigApplicationContext对象创建的参数时,该注解可以不写。
- 属性:
value:用于指定配置类的字节码
- 属性:
1 |
|
1 | ApplicationContext ac=new AnnotationConfigApplicationContext(SpringConfiguration.class); |
@ComponentScan
- 作用:用于通过注解指定spring在创建容器时要扫描的包
- 属性:
- value:它和basePackages的作用是一样的,都是用于指定创建容器时要扫描的包。
我们使用此注解就等同于在xml中配置了:<context:component-scan base-package="com"></context:component-scan>1
2
3
4
5
(basePackages={"com"})
//@ComponentScan("com")
public class SpringConfiguration {
}
- value:它和basePackages的作用是一样的,都是用于指定创建容器时要扫描的包。
Bean
- 作用:用于把当前方法的返回值作为bean对象存入spring的ioc容器中
- 属性:
- name:用于指定bean的id。当不写时,默认值是当前方法的名称
- 细节:当我们使用注解配置方法时,如果方法有参数,spring框架会去容器中查找有没有可用的bean对象。查找的方式和Autowired注解的作用是一样的
1 | (name="runner") |
@Import
- 作用:用于导入其他的配置类
- 属性:
- value:用于指定其他配置类的字节码。
- 当我们使用Import的注解之后,有Import注解的类就父配置类,而导入的都是子配置类
1
2
3
4("com")
(JdbcConfig.class)
public class SpringConfiguration {
}
@PropertySource
- 作用:用于指定properties文件的位置
- 属性:
- value:指定文件的名称和路径。
- 关键字:classpath,表示类路径下
1 | ("com") |
总结
最方便的方式是xml+注解形式,自己写的类用注解更便捷,jar包中的类用xml更简洁
Spring整合Junit
问题
在测试类中,每个测试方法都有以下两行代码:
1 | ApplicationContext ac = new ClassPathXmlApplicationContext("bean.xml"); |
- 这两行代码的作用是获取容器,如果不写的话,直接会提示空指针异常。所以又不能轻易删掉。
Junit分析
- 应用程序的入口:main方法
- junit单元测试中,没有main方法也能执行
- junit集成了一个main方法
- 该方法就会判断当前测试类中哪些方法有 @Test注解
- junit就让有Test注解的方法执行
- junit不会管我们是否采用spring框架,所以不会为我们读取配置文件/配置类创建spring核心容器
- 由以上三点可知:当测试方法执行时,没有Ioc容器,就算写了Autowired注解,也无法实现注入
Spring整合junit的配置
- 使用Junit提供的一个注解把原有的main方法替换了,替换成spring提供的:@Runwith
- 告知spring的运行器,spring和ioc创建是基于xml还是注解的,并且说明位置
@ContextConfiguration
- locations:指定xml文件的位置,加上classpath关键字,表示在类路径下
- classes:指定注解类所在地位置
- 当我们使用spring 5.x版本的时候,要求junit的jar必须是4.12及以上
配置步骤
1.导入Junit jar包
2.使用@RunWith
1 | (SpringJUnit4ClassRunner.class) |
3.使用@ContextConfiguration 指定 spring 配置文件的位置
1 | (SpringJUnit4ClassRunner.class) |
4.使用@Autowired 给测试类中的变量注入数据
1 | (SpringJUnit4ClassRunner.class) |
为什么到 不把测试类配到 xml
测试类配置在xml中也可以使用
- 当我们在 xml 中配置了一个 bean,spring 加载配置文件创建容器时,就会创建对象。
- 测试类只是我们在测试功能时使用,而在项目中它并不参与程序逻辑,也不会解决需求上的问
题,所以创建完了,并没有使用。那么存在容器中就会造成资源的浪费。 - 基于以上两点,我们不应该把测试配置到xml